Like many people, I LOVE the taste of pure maple syrup. About a decade ago, when I moved to the Maine woods, I decided that it was time to try to make my own. The first thing I investigated was of course the trees. I have LOTS of maple trees, but I wasn't sure whether they were the right kind of trees for making syrup. I looked through several books, and web pages, and talked to several people who make syrup, and got several opinions. Some people said that any maple will produce good syrup, while other people said that you absolutely have to have sugar maples. Not being able to get a for sure answer, I decided to just try it. To make a long story a bit shorter, I've tried making syrup from sap of sugar maples and from the sap of red maples, and what I've found is that both produce excellent syrup. In fact I prefer the syrup from the red maples myself. However there is more sugar in the sugar maple sap, so to get a quart of syrup from sugar maple sap, you need about 40 quarts of sap, while from red maple sap, you need 50 to 60 quarts of sap.
Identification of the trees
Re identification of various maples, most are relatively easy to identify, at least while the leaves are on the trees, although I'm not convinced that there may be some hybrids between red maple and sugar maple. Pictures of a few selected leaves of red and sugar maple are shown below:
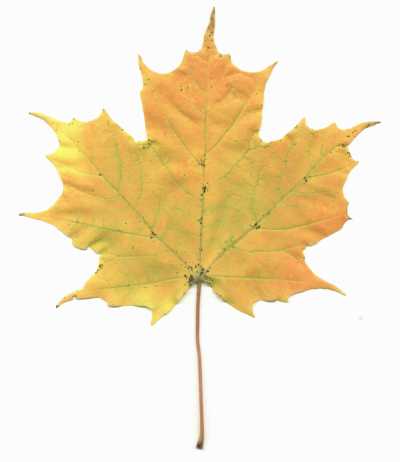
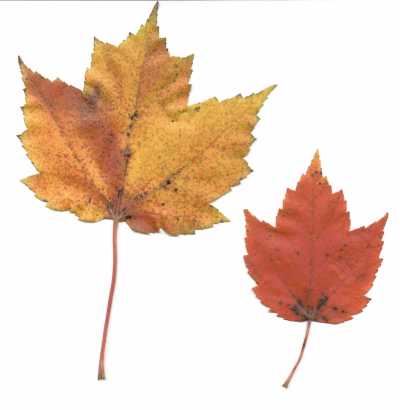
First is a sugar maple, identified by the rounded indentations between the five main lobes, and the lack of serrations. The last small red leaf is a red maple, has sharp indentations between the three main lobes, and lots of small serrations. In between is a red maple, which may just be a variation of the regular red maple leaves, although it almost seems like a hybrid, because it seems to have 5 main lobes like the sugar maple, is big like the sugar maple, but has the sharp notches and serrations like the red maple. I'm pretty sure that these are in fact red maples, but I'm not positive.
When trying to identify maple trees in winter, they are distinguished from oak and beech by the fact that maples have opposite leaves, and the buds, particularly of the red maple are quite prominently opposite, while oak and beech are alternate. There may be some confusion if you have ash trees, as ash trees also have opposite leaves, although the bark of ash trees is quite distinctive, and ash trees often leave feathery fruit stems at the tips of the branches in the winter. However, it is best to identify and mark your trees in the summer when the leaves are on them. In any event, I can testify that syrup made from either the red or sugar maple, and probably from other maple varieties is quite tasty.
Choosing which trees to Tap.
Once you've identified your maple trees, choose which trees to tap based on size and shape and location. I.e., in general, it is better to tap big trees rather than small trees, so that you don't stress the trees, plus the sap from bigger trees seems to be of a higher quality. How big is big enough? Well, I've read that you shouldn't tap trees less than 10 to 12 inches in diameter. I have tapped trees as small as 10", but I think it's best to use trees that are at least 12". If your trees are somewhere around 15 to 18" in diameter, you can put 2 taps on one tree. For really big trees, above 2 feet in diameter, some people put up to 4 taps on a tree, but this isn't recommended unless the trees are very healthy.
Another thing to consider is the health and shape of the tree. Trees that are not crowded and healthy will usually be full round shaped trees with broad branches near the bottom as well as up high, while crowded trees don't put out as many branches near the ground if they are crowded and have to grow up to reach the sunlight. Thin crowded trees with most of the branches near the top, aren't as healthy as broad rounded trees that get full sunlight. Of course you may not have a choice, but if you do, choose the healthy trees.
Another factor is location. I tap trees, some of which are near the top of a southerly facing hill, while other trees are in the valley. I've found that the trees near the top of the hill start producing earlier due to their better exposure to the sun, however they also quit producing earlier for the same reason. Even at times when all the trees are producing, I've found that some days the valley trees produce more, and other days the hilltop trees produce more. If you are tapping a lot of trees, and want an extended season, then you should probably have trees from different locations, to get production at all times during the season. However, and this is the case for me, if you only tap a few trees, then it might be best to tap trees from a small area, and also tap trees of the same variety. For example, I usually tap about 10-12 trees, and boil in batches, and generally wait until I have about 15 gallons before I boil. If my trees are spread all around my property, and are a mixture of red and sugar maple, what happens is that only 4 or 5 of the trees will be producing at the same time, and it may take several days to accumulate 15 gallons, and often the sap starts to degrade before I get enough, since it's best to boil within a couple days. If, however, I would keep all my trees close together, besides making it easier to collect the sap, all of the trees are more likely to be producing at the same time, so I can accumulate the necessary amount of sap quicker, and don't waste sap by it degrading waiting for other trees to produce.
When to tap your trees.
This is something that I haven't quite figured out myself yet. I have read many conflicting opinions. I've read that you should never tap a frozen tree, yet I've also heard people say that they tap their trees in January, when the trees are definately frozen here in Maine. I have also read, and verified, that the sap runs best when it gets well down below freezing at night, but is sunny and warm, well above freezing during the day. I have also read, that you should stop collecting sap when the trees bloom. Red maples bloom between March and May, and sugar maples bloom between April and June, depending on your temperature zone. But you can see that red maples bloom earlier than sugar maples, so that the season will last a bit longer for the sugar maples.
I generally watch the temperatures, and when it starts getting above freezing during the daytime, I usually think about putting out my taps. However I know that there is generally a warm spell in early Feb, when it is warm enough to tap, and there is probably sap running, but I know that the temperatures always turn cold again, resulting in weeks with no sap flowing, so I usually don't set my taps the first time it gets warm. I usually wait until the first warm spell in March, although this could be earlier further south or later further north. It's best to experiment the first couple years, setting a few taps early just to see when the sap starts running.
Another factor, is how you intend to collect sap. I.e., if you intend to do it by foot, it may not matter, but if you intend to use a snowmobile, then of course, you need the snow to still be around, while if you intend to use a tractor or ATV, then it's probably best to tap when the snow isn't so deep.
How to tap and collect sap.
To tap a maple, most people use a 7/16th" drill bit, and drill a hole that is a couple inches deep. Drill about waist high to chest high off the ground, depending on how much snow there is. I.e., when you first tap, if you are standing on 2' of snow, don't tap too high, or the taps might be over your head after the snow melts. I've read that it doesn't matter whether you tap on the north or south side of a tree, however I've observed that trees that taps that are exposed to the sun seem to produce more than taps that are in the shade most of the day. Drill with a slight upward inclination so that sap doesn't collect in the hole, and drains out better.
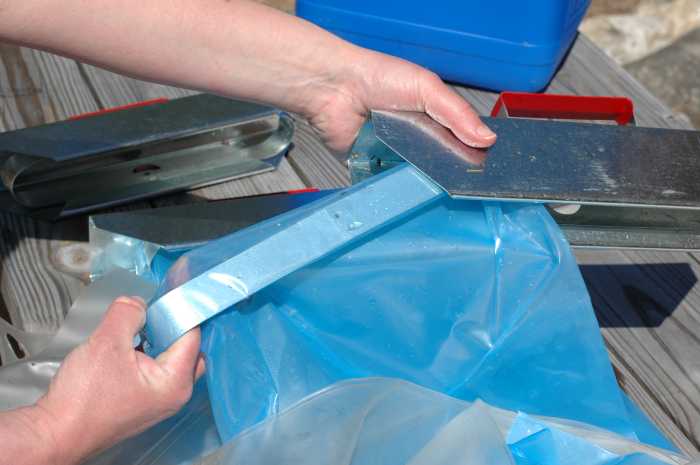
After drilling your hole, you need a spile. There are several different types of spiles, or you can even make your own out of wod. Some examples are shown below:

The spile on the bottom is a very old type, and is supposed to be used with a little hook that can hold a bucket. On the left, I've shown a threaded piece of pvc pipe that I use to adapt the old type spile to the leader sap bags. The spile is just inserted through the hole in the bag, then the pvc adapter is screwed on to keep the bag from sliding off. The upper two spiles are more modern, and work well with the metal bag holders or buckets. Not pictured, there are also plastic spiles that connect directly to plastic tubing. These can be used with any bag or bucket, or with a matrix of tubing for collecting.
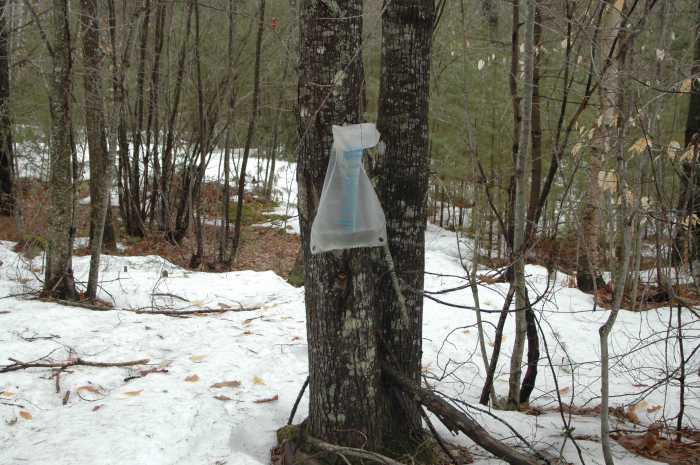
As mentioned above, you can either collect in buckets or in bags, or even in something as simple as gallon milk containers. The smaller the container, the more often you need to collect.
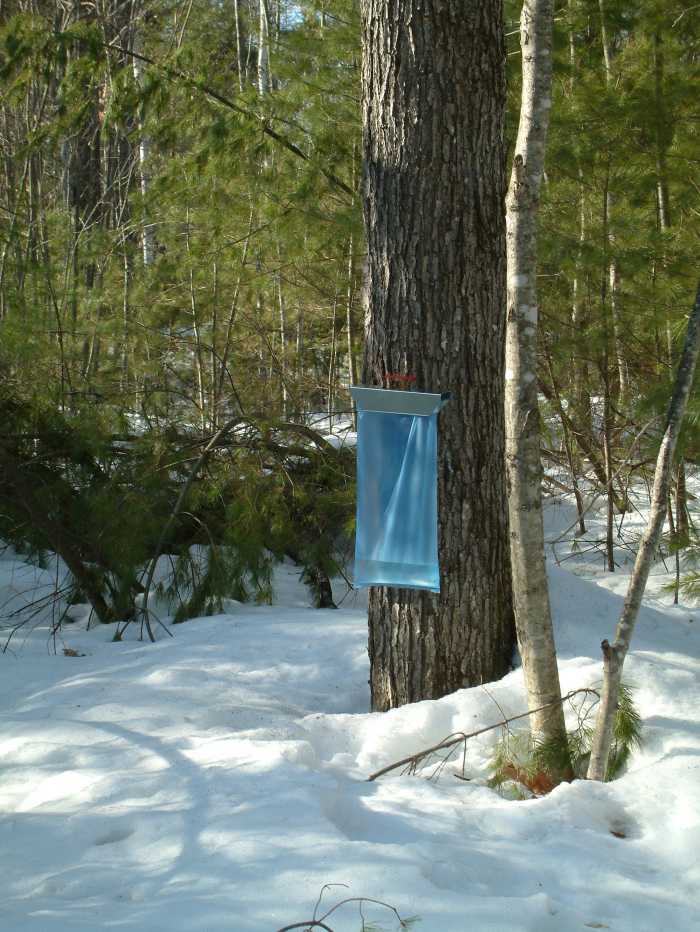
I've shown a few examples of sap bags below:
First a view of a Leader bag on a tree, followed by a closeup showing my pvc adapter for the old style stiles:

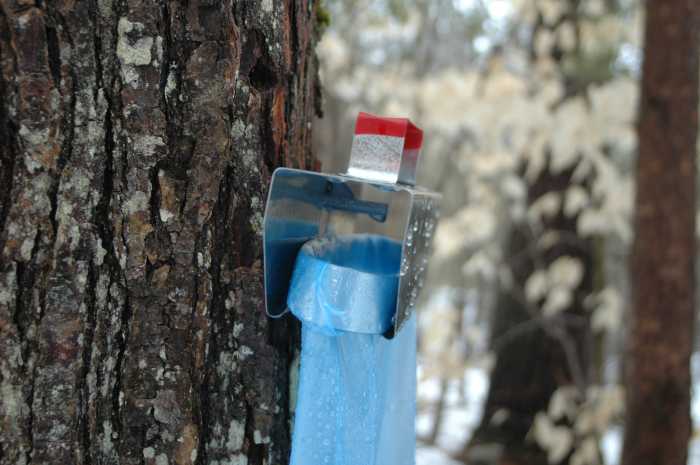
Below several views of the newer disposable bags which use a metal holder.
First a view showing how the bag fits in the holder, then a view of the bag on a tree and a closeup showing the spile sticking through the hole in the metal holder:
To collect the sap, once the bags fill up, I generally carry a 5 gallon water bottle in the back of my snowmobile, and drive up to the trees, then with help of a big funnel, pour the contents of each bag into the 5 gallon bottle. The bottles can also be carried by hand to the trees, but they get quite heavy quite quickly.
BOILING the sap.
Pans.
Professional maple syrup producers use expensive continuous process evaporators. Besides being expensive, these require a LOT of sap to operate. This is not practical for the average hobbiest. Most hobbiests use a batch process instead. Batch evaporation is nothing more than putting a big pan on a heat source and boiling it down. I use stainless steel steam table pans, which are available from many restuarant supply stores. I recommend a full size 6 gallon size of the heaviest metal available. When you start evaporating, you will be adding fresh sap as the boiling progresses. If the added sap is cold, it stops the boiling process, and really slows down the process. What I recommend, is to use at least two pans, one used to pre-heat the fresh sap, which is then added to the primary boiling pan once hot. Actually, if you have enough heat on the pre-heating pan, you can do a considerable amount of the evaporation in the pre-heating pan, which really speeds things up, because as the primary pan gets more and more concentrated, the evaporation slows down considerably, so it helps to reduce the volume of sap as much as posible before it goes into the primary evaporator pan.
Heat source.
Over the years, I have tried several different heat sources. Of course, you can just put the pans on your kitchen stove, however this is not recommended, because you will coat the ceilings and walls of your house with sugar. So it is best to do the evaporation outside.
The first couple times I did syrup, I tried to do it on a regular propane barbecue grill, like you'd cook steaks and hamburgers on. This, however doesn't produce sufficient heat, and it will take all day to boil just a few gallons of sap. After trying this, I the bought a 2 burner propane unit, like they use to heat a lobster pot or something like that. These put out quite a bit more heat than a barbecue grill, however they really go through propane fast, which makes the production of syrup more expensive than buying it at the store. Because of this, it is recommended to use a heat source using wood as fuel, since most people with maple trees also have a supply of firewood.
My first year using wood fuel, I bought a very cheap wood stove, and tried to just put the evaporating pan on top of the wood stove. This just didn't produce enough heat to boil the sap. I had to enclose the wood stove inside walls of concrete blocks to hold the heat in. I also ended up cutting a big hole in the top of the wood stove to allow the flames to directly contact the pan. However this still wasn't efficient enough.
The following year, I switched to using an outside fireplace for the primary evaporator, and used the above wood stove for pre-heating only. This worked pretty well, however there was one disadvantage, and that was that smoke and ashes from the fire would tend to float up, and then fall into the boiling sap, making the resultant syrup a bit darker than normal. It did not seem to affect the flavor of the syrup, but just didn't seem as clean as the previous but slower methods. The heat using the outside fireplace, however, was much better, and I could boil up to 15 or 20 gallons in a day, albeit a LONG day, often starting at 7:00 and not finishing until 7 or 8PM in the evening.
This year, however, I was determined to find a way to get efficient heating and pre-heating without having the problem of smoke and ashes getting into the boiling sap. This year, I tried 3 different approaches. The first approach is shown below:
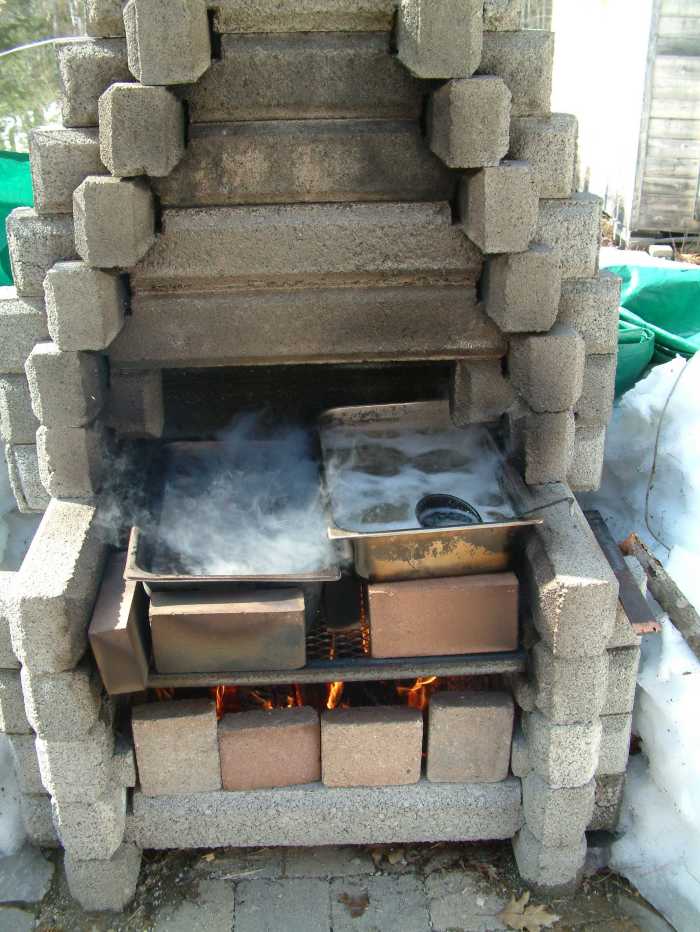
The above is an outdoor fireplace made from Lincoln Log concrete blocks. These are available locally, and can be put together easily. What I've done here, is to try to contain the firebox, both in the front to keep the heat in, and also I surrounded my 2 pans with bricks, in an attempt to keep the flames from coming up around the edges of the pans, which is when ashes tend to fall into the boiling sap. The pan on the right is my pre-heat pan, and is a bit higher than the primary pan where I need maximum heat. There wasn't room in the fireplace to have them both on the metal grill. You can see the ladle that I use to transfer pre-heated sap from the right pan to the left pan. This worked quite well, heat wise, however I still got a bit of ashes collecting in the boiling sap.
So what I tried next, was to get out the old metal wood stove, but instead of just putting the pan on top, I completely took the top off, which luckily was attached by bolts. With the top off the 6 gallon pan fit nicely inside the stove, leaving about a 5" gap at the back for the smoke to come out. What I did, was place a metal drip pan from an old propane grill over this 5" gap, and place a section of metal flue pipe over the hole in the dip pan. This provided a way for the escaping smoke and gasses to get out and up the chimney without coming back and dropping ashes into the sap. See picture below:
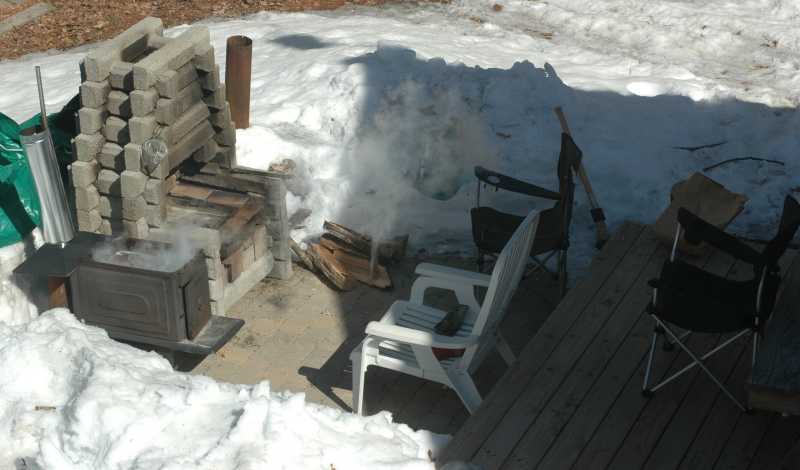
With this setup, I still used the concrete wood stove for pre-heating, and completely surrounded the pre-heat pan with bricks to keep the ashes out. This worked better, however I still got a little blowback of ashes, mainly because the back was open because the drip pan wasn't closed on the bottom, and since there wasn't much draft, I had to keep the front door of the stove open.
My third setup, is shown below:
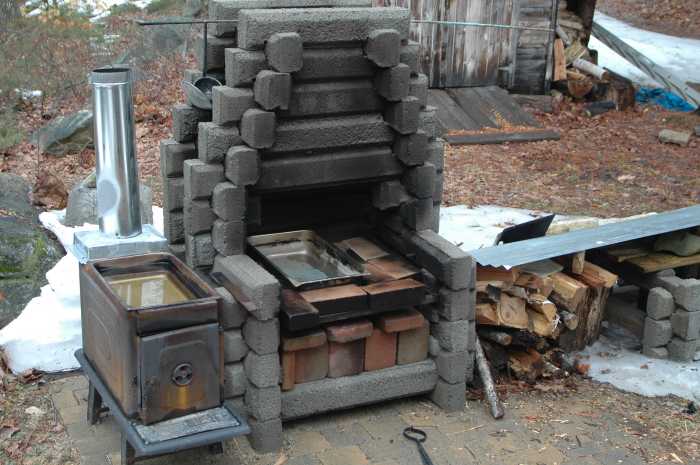
With this setup, I constructed a sealed box out of the metal of a flue pipe, and attached it to a flue pipe chimney. This provided a good enough seal that I got much better draft, so that all the smoke went up the chimney, and allowed me to close the front door more completely. As you see, by the time I got this arrangement going, the season was almost over, as evidenced by the lack of snow, but I did get to try it once, and it worked quite well. It was very efficient heat wise, and very little ash got into the sap. Instead of taking all day to boil, I was able to boil 16 gallons between 8:00 AM and 2:00PM, making the process a relaxing day in the back yard.
When to stop boiling:
When you make maple syrup, it is very important to boil the sap down to the proper concentration. If you boil it too much, the syrup will crystallize on cooling, which is both wasteful of syrup, but also, in my experience, the crystallization will continue past the point of ideal syrup so you end up with big sugar crystals covered by a watery liquid, which is not ideal. If you don't boil it down enough, the syrup will not be concentrated enough, which will permit bacteria to grow in the syrup, and it won't last as long.
There are a variety of ways to determine when the sap has evaporated enough to make good syrup. Some people use a candy thermometer. I tried this, however ran into several problems. Most thermometers have an immersion depth, i.e., a specific portion of the thermometer is supposed to be immersed in the liquid to read properly. The thermometers I tried were extremely sensitive to how deep they were immersed in the boiling sap, to the extent that I never could get an accurate reading. In addition, the boiling point of water and syrup changes depending on the atmospheric pressure. What you need to do is rather than shooting for a specific temperature, like 219, you need to first determine the boiling point of water, then add about 7 degrees to that value. I.e., if water boils at 210, then you shoot for 217. However, since with changes in the weather, atmospheric pressure changes during the day, so that what you determine in the morning when you start boiling may not be the ideal temperature in the afternoon when you finish. Anyway, most people use the thermometer method, however I have not had good luck with it.
Another method that many people use, is to use a density meter. Syrup should have a "Brix" value of about 66, which corresponds to specific densities at different temperatures. You can obtain a hygrometer that will give you an apparent brix value, measure the temperature of the liquid, and then use a conversion table to convert to the actual Brix value. The problem is, that the hygrometers are reltively big, and need a tall vessil to operate, thus requiring a lot of syrup. Unless you have a very big evaporator, you pretty much have to take most of your boiled syrup out of the pan and transfer it to the hygrometer vessil to measure the density, and then if it isn't correct, then you have to return it to the evaporator pan to continue boiling, during which time, you've lost the temperature in your pan and lost a lot of time. I've used the hygrometer to ensure that I have boiled enough, after the fact, but it isn't an easy method to use to determine WHEN to stop boiling.
Beleive it or not, the best method I have found, is to just observe the behavior of the boiling sap. I've noticed several different phases that the sap goes through as it is being concentrated. First, depending on the amount of heat, it is obviously a light liquid in a random full boil with non persisting bubbles. After it concenrates quite a bit, you start to get a very slight thickening, and some development of color. Then you get to a stage where you get rather big individual bubbles, and when the liquid splashes up on the hot sides of the pan, you can smell the burnt syrup smell. At this point you are starting to get close, and need to watch the boiling closely.
I've found that when you start getting very close to the proper concentration, that a sort of "scum" of sugar will form on the surface at the hot spots. I.e., bubbles will form in a circle around a hot spot, and in the center of the circle will be an area where there are no bubbles, but instead what seems to be a semi-solid scum forming. Also, when you get to this stage, if you gently rock the boiling pan by lifting one end, a slow wave will propagate down the length of the pan, and boiling will be observed at the crest of the wave each time the wave washes up on the hot end of the pan. The boiling wave will persist longer and longer as you get nearer to the proper concentration. When this occurs, I take my syrup off the outside stove, and take inside the house for finishing.
Before preparing to finish inside, I get all prepared to filter, because you need to filter while the syrup is hot. When ready, I continue the boiling process inside, again gently rocking the pan watching the boiling wave go back and forth the length of the pan, watching how long the wave continues to foam after splashing up on the hot end of the pan. Eventually, the boiling wave, will continue to boil as it goes back and forth. At this point you are very close, and quite soon, the whole pan will erupt into a foaming mass, where the foam gets an inch or two deep, sometimes even overflowing the pan, depending on how much heat you have applied. Once at this stage, I usually try to allow it to boil in this state for aproximately a minute or two before taking it off the heat. This out of control foaming point is my indication that I have reached the proper concentration, and I've found that syrup boiled to this point is generally 66 Brix. However, the behavior may tend to be a bit dependent on the type of stove being used. I use a gas stove, and place the pan over 2 burners on at full. You need to experiment to see what the behavior of syrup is on your stove. But you won't be too far off if the syrup is at the nearly out of control foaming boil stage.
Filtering and packaging.
As mentioned above, you ned to filter while hot, or else the filter will clog with the viscous syrup. There are several different types of filters that you can buy. Some are BIG filters made of relatively thick cloth. These are supposed to be good, but they require a very large amount of syrup to be effective, otherwise you'd lose the majority of your syrup absorbed in the cloth filter. I have one of these, but never use it.
Instead I use thinner filters made either of paper, fiberglass, or a polymer material. These are often referred to as "pre-filters", but I've found them to be very effective. Currently, I use a fiberglass filter inside of one of the polymer filters, thus using the fiberglass as the pre-filter. This works quite well, and results in very little loss, typically about a fourth of a cup or less of loss in a quart batch. To prevent efficient filtering though, you need to first wet the filters with water, allowing them to drip dry so as not to dilute the syrup too much.
Pour the hot syrup into the filter. A bit more than about half the syrup will go through the filter before the filtering process slows down to a drip. At this point, I usually grab the bottom of the filter with tongs, and lift it above the level of the syrup in the filter. This exposes fresh filter surface to the hot liquid, allowing the filtering process to go fast again.
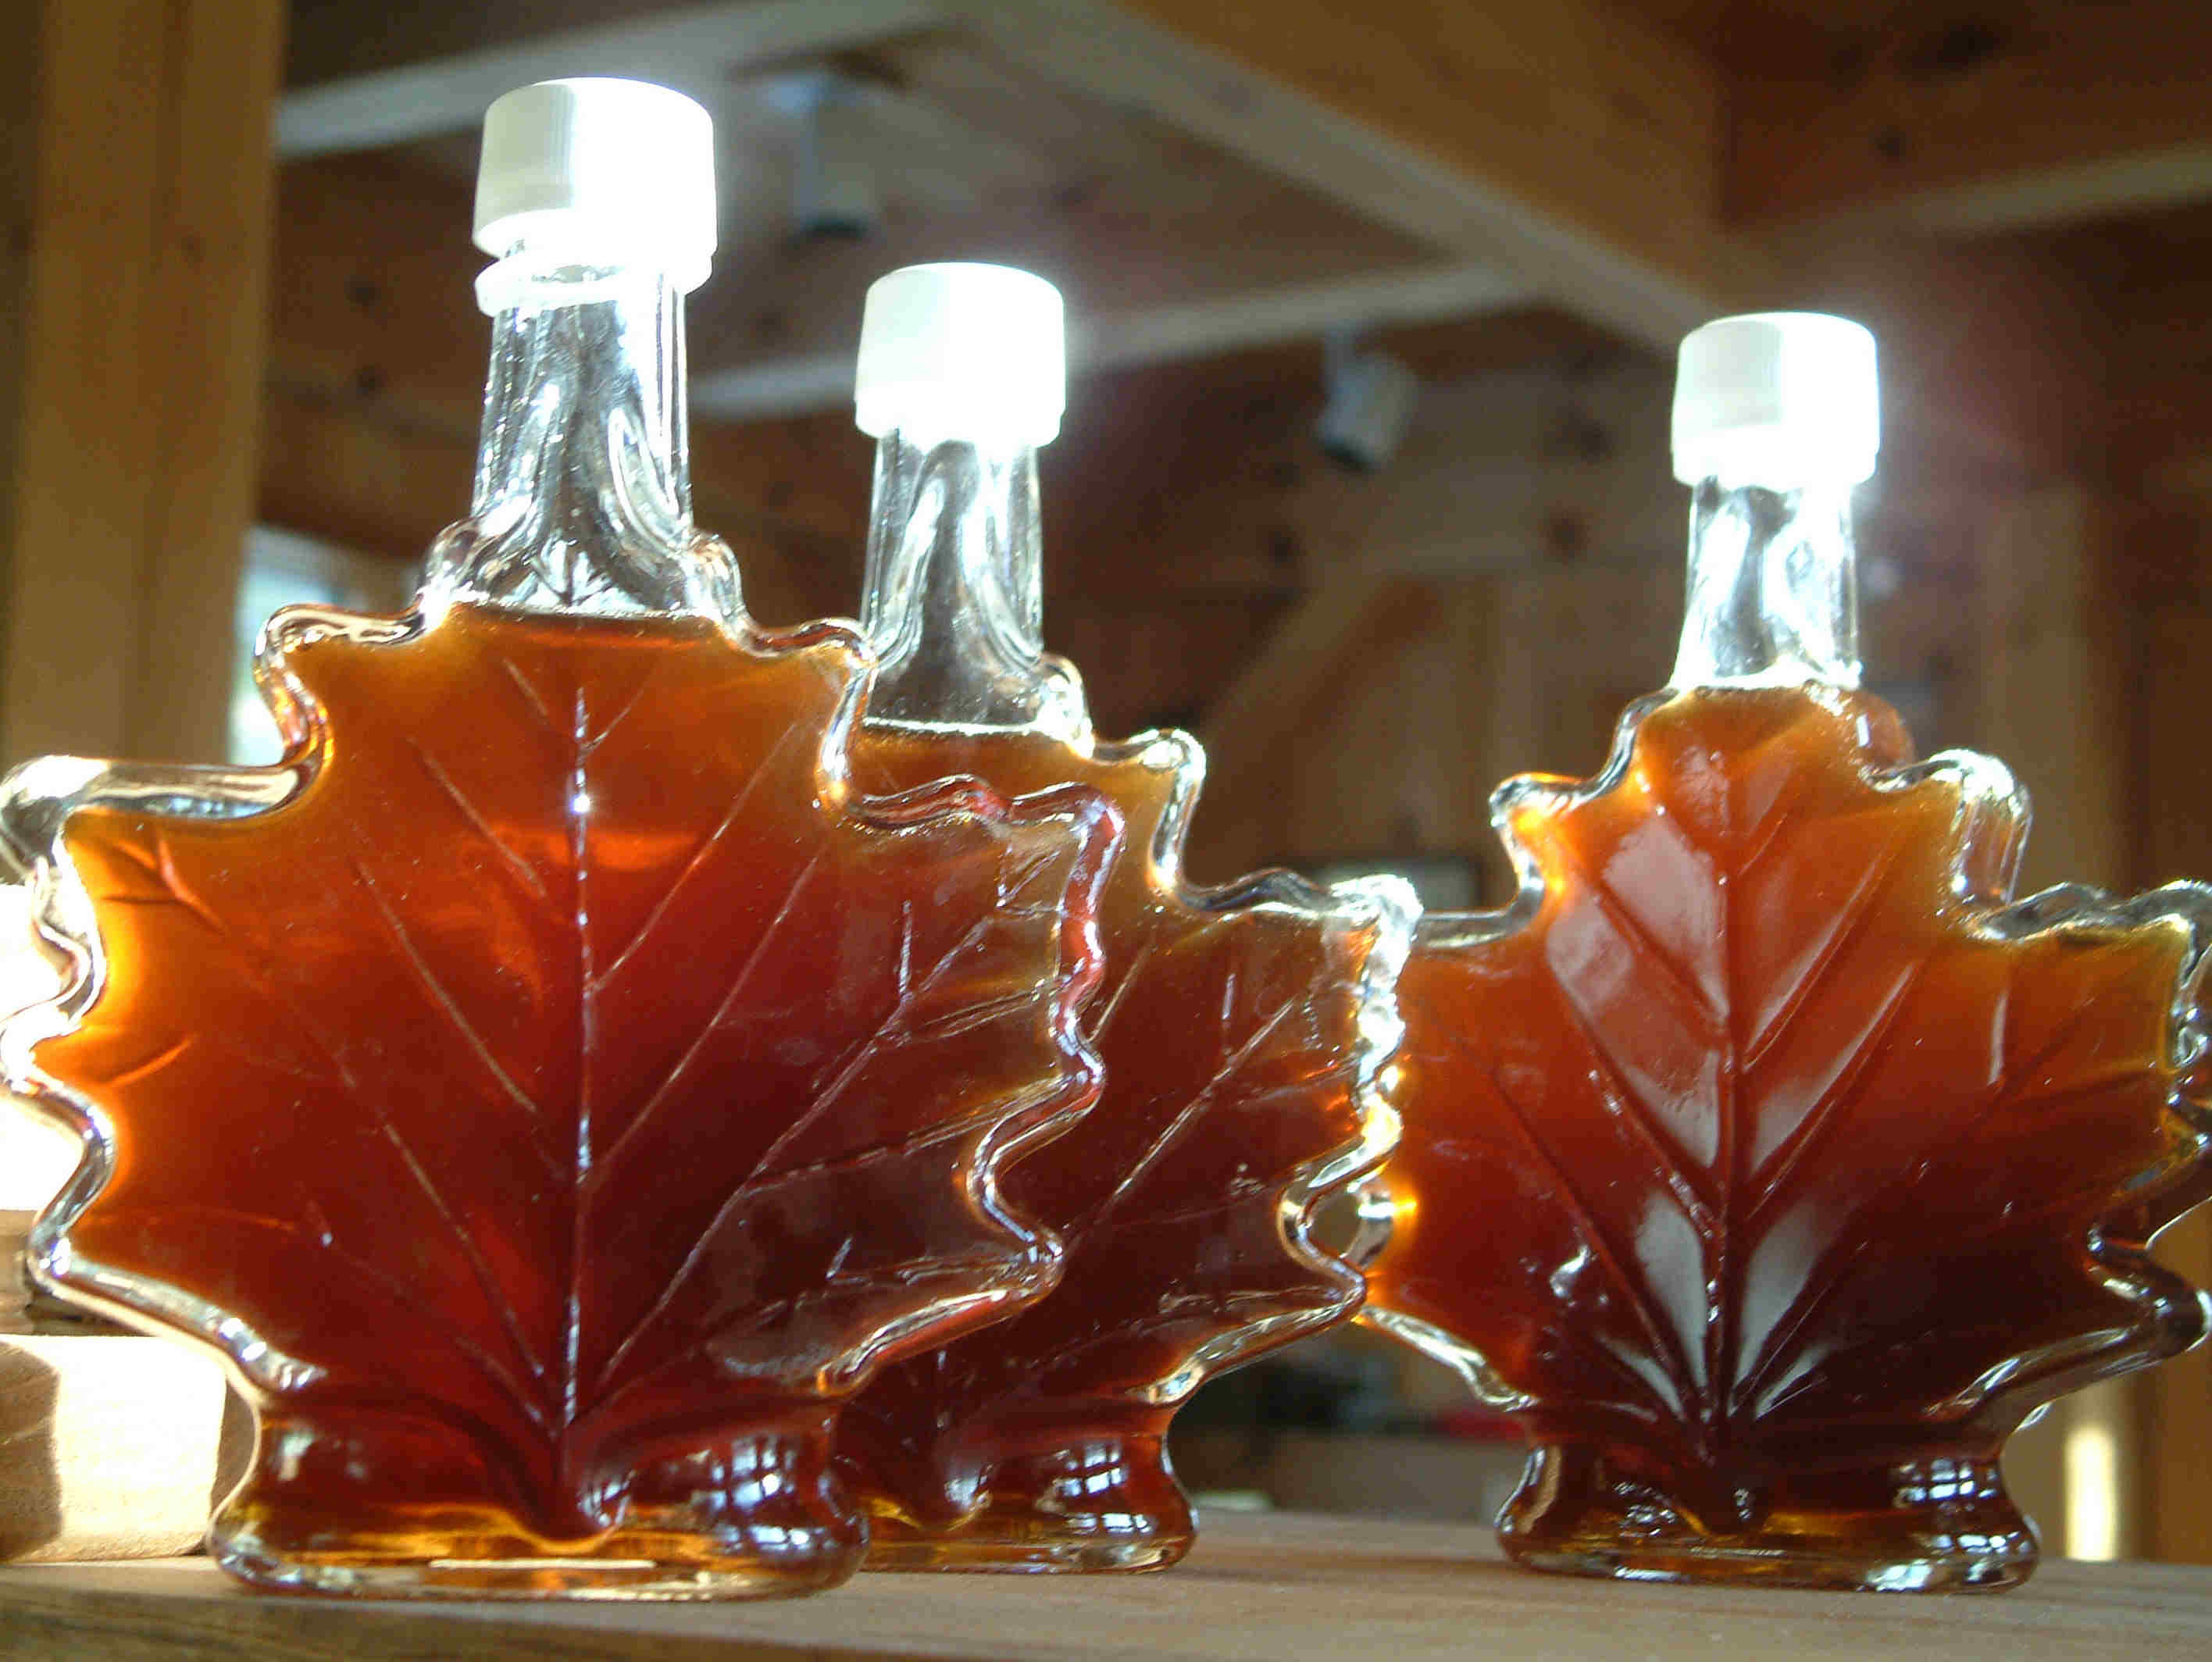
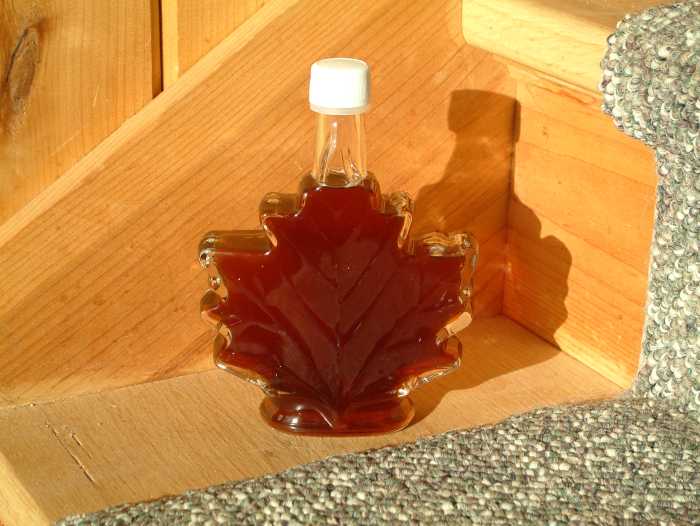
After filtering, I pour the syrup into sterilized mason jars or fancy containers. I like to use clear containers, so that you can see what the syrup looks like while in storage. Your final result is wonderful maple syrup.
Maple sand, mold, bacteria and sugar crystallization.
After pouring into the storage containers, the syrup generally looks quite good. However on storage, sometimes strange things happen to the syrup. The first, and least important, is the formation of the so-called maple sand. Maple sand is nothing more than the minerals that naturally occur in the maple sap precipitating out of the sap on cooling. Generally, you can filter out the maple sand, however since you filter hot, sometimes the sand hasn't finished forming by the time you filter. What you will see is shortly after the syrup cools, it gets ever so slightly cloudy. One thing that you can do, is to re-boil this syrup, which generally won't re-dissolve this sand, then on filtering again, you will remove it. If there is only a small amount of cloudiness, you can just ignore it and let it settle. You can either just pour the clear syrup off the top, or you can decant the clear liquid into a new container, and save the cloudy syrup at the bottom for re-boiling.
Mold is another problem. If you have boiled your syrup enough to get the proper concentration, you generally won't have to worry about mold formation. However if the syrup is a bit weak, or if it has been stored for a very long time, you sometimes get some mold forming on the surface of the syrup. This has happened to me a couple times, and I've been able to draw off clean syrup from underneath the mold scum on the surface. I then re-boil this, and re-filter it, and it is then good as new. I generally wait until I have a couple quarts that have gone bad, before doing this.
Bacteria is similar to mold, in that it is usually only a problem if your syrup is too low a Brix concentration. But I have had a couple batches go bad via bacteria. The problem with bacteria, however, is that it tends to be slimy blooms throughout the syrup rather than just on the top. You can't decant the syrup off the bacteria bloom, plus, it seems to be difficult to filter it out. I generally throw away syrup that has developed bacteria infection.
The last problem situation is sugar crystallization. This is usually a situation of having boiled the syrup too far. If you notice that crystallization is occurring, it is best to immediately pour the good syrup off into another container, because the existance of sugar crystals in the syrup will aid the formation of additional crystallization. I've found that you can start with syrup that is considerably more than the ideal 66 brix, and once crystallization occurs, it can take you well down below 66 brix, whereas if you start out at 66, it generally will never crystallize. This is why boiling to the right concentration in the first place is so important.
If your syrup does crystallize, you can combine it with some other batches for re-boiling, and hopefully get the crystals to dissolve again. And if so, your syrup will be as good as new again.